


We ordered the tunnel form an online polytunnel supplier called First Tunnels. The range of product they offered was very impressive and there prices were among the cheapest we could find. After discussing among ourselves (May Project coordinators) we decided that the 12 x 15ft polytunnel with a anti-drip, UV-filter polythene covering was the best option given the size of the garden and the budget we had to work with.
The tunnel was due to be delivered within three weeks however it did not arrive until a month after ordering. The delay was not appreciated but we put it behind us and got on with the more important stuff.
The site was chosen well before the tunnel arrived and we went about preparing it for the day when the steel frame would be erected.
 DAY 1
DAY 1
Once the tunnel arrived, we first made sure that all the parts were provided and then we accurately measured out the site. We were provider with anchor plates to help strengthen the foundation tube, which we buried at a depth of approx 30cm.

 DAY 2
DAY 2
The next step was to connect the hoops to the foundation tubes. This involved connecting four individual steel tubes (of various shapes and sizes) together to form an arch shaped structure then mounting these arches onto the partially buried foundation tubes. This proved difficult because we did not have a large enough leveled surface to lay the arches on before permanently securing them together. But with a bit of ingenuity we managed to get the job done.
 We then added the rest of the framework. The side rails, the crop bars, and the ridge, all of which provides strength and stability. The ridge we ordered also acts as a ventilation system allowing rising hot air to slowly escape out of the tunnel therefore allowing for good air circulation and preventing the crops from overheating.
 The frames for both doors were built as were the doors to fit them. This was the easiest part of the entire construction process as it only involved cutting pieces of timber to size, and hammering them into place.

 DAY 3 and 4
We were required to dig a trench all around the site to anchor the polythene covering. On the southern side of the site there was once a line of 10ft trees that were recently cut down, leaving there roots still embedded in the ground and they were an obstacle and had to be removed before construction could commence.
It was the most difficult part of the erection of the tunnel to date it took us two days to get all the roots out of the ground. We dug around each trunk, to about 15cm deep, and 30cm in diameter, and ripped them up using forks, metal rods and brute force.
 DAY 5, 6 and 7
Digging the trench took the prize for being, by far, the most difficult part of constructing the polytunnel. We dug for three days straight, going to a depth of 40cm an a width of 10cm around the perimeter of the framework. On completion we calculated that we had dug out over 20.7 cubic feet of earth.
 On the second day of digging we walked out to the site only to be greeted by a baby fox trapped in our newly dug trench. We were all rejoicing at first, knowing that we had finally caught one of the culprits responsible for all the destruction in the garden over the past few months. Then we noticed that both back legs were being dragged behind it as the cub struggled to climb out, without success. We deduced that it might have had fallen in the night before and broken its' back.

 So we then called the RSPCA (The Royal Society for the Prevention of Cruelty to Animals) and they came in and took it away. We kindly asked him, the RSPCA officer, not to release it back into our area. We hope he didn't.
DAY 8
With the trench completed the door frames were then fitted and the doors covered.
 We connected the door frames to the tunnels' framework using p-clips and we covered the doors using mesh at the top, to aid ventilation and polythene at the bottom.
 DAY 9
DAY 9
The main event. Finishing off the polytunnel. Covering is said to be the most important part of polytunnel construction, get it right and a polytunnel could last you 7 years without needing to replace the covering. So it is no surprise that we took our time to get the covering right. We first lined the framework with anti hotspot tape (this protects the covering which comes into direct contact with the steel frame from getting damaged as a result of the framework heating up).
 We then cleared the area of stones and any other sharp objects that might tear the polythene, unwrapped the sheet and placed it over the framework, making sure it was the right way up.

 Getting the cover tight was the next step and this was done by back filling the trench while stretching the cover. Tightening the sides was not a problem.
 The front and the rear were more challenging as we had to pleat the polythene while tightening by pulling and nailing the sheet to the door posts. My wrists still ache. We had a few finger marks on the covering but nothing to worrying.
 DAY 10
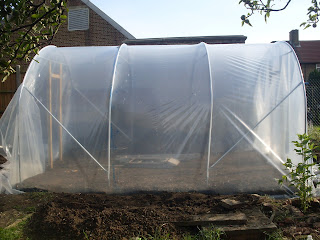
The most rewarding day of them all. Working inside the tunnel is the most amazing thing in the world. We made beds along both sides of the tunnel, leaving space at the back for staging, where plants would start their lives in pot and trays before being planted out. We are also considering making another bed right down the center, but we might leave that for next season.
Well there you have it. Ten days of hard labour with the results nothing short of amazing. I was working in the tunnel yesterday while it was pouring down raining outside. I was so happy i started dancing, in the tunnel, under the rain, dry as a bone.....Brilliant.

The tunnel was due to be delivered within three weeks however it did not arrive until a month after ordering. The delay was not appreciated but we put it behind us and got on with the more important stuff.
The site was chosen well before the tunnel arrived and we went about preparing it for the day when the steel frame would be erected.
 DAY 1
DAY 1Once the tunnel arrived, we first made sure that all the parts were provided and then we accurately measured out the site. We were provider with anchor plates to help strengthen the foundation tube, which we buried at a depth of approx 30cm.

 DAY 2
DAY 2The next step was to connect the hoops to the foundation tubes. This involved connecting four individual steel tubes (of various shapes and sizes) together to form an arch shaped structure then mounting these arches onto the partially buried foundation tubes. This proved difficult because we did not have a large enough leveled surface to lay the arches on before permanently securing them together. But with a bit of ingenuity we managed to get the job done.
 We then added the rest of the framework. The side rails, the crop bars, and the ridge, all of which provides strength and stability. The ridge we ordered also acts as a ventilation system allowing rising hot air to slowly escape out of the tunnel therefore allowing for good air circulation and preventing the crops from overheating.
 The frames for both doors were built as were the doors to fit them. This was the easiest part of the entire construction process as it only involved cutting pieces of timber to size, and hammering them into place.
 DAY 3 and 4
We were required to dig a trench all around the site to anchor the polythene covering. On the southern side of the site there was once a line of 10ft trees that were recently cut down, leaving there roots still embedded in the ground and they were an obstacle and had to be removed before construction could commence.
It was the most difficult part of the erection of the tunnel to date it took us two days to get all the roots out of the ground. We dug around each trunk, to about 15cm deep, and 30cm in diameter, and ripped them up using forks, metal rods and brute force.
 DAY 5, 6 and 7
Digging the trench took the prize for being, by far, the most difficult part of constructing the polytunnel. We dug for three days straight, going to a depth of 40cm an a width of 10cm around the perimeter of the framework. On completion we calculated that we had dug out over 20.7 cubic feet of earth.
 On the second day of digging we walked out to the site only to be greeted by a baby fox trapped in our newly dug trench. We were all rejoicing at first, knowing that we had finally caught one of the culprits responsible for all the destruction in the garden over the past few months. Then we noticed that both back legs were being dragged behind it as the cub struggled to climb out, without success. We deduced that it might have had fallen in the night before and broken its' back.
 So we then called the RSPCA (The Royal Society for the Prevention of Cruelty to Animals) and they came in and took it away. We kindly asked him, the RSPCA officer, not to release it back into our area. We hope he didn't.
DAY 8
With the trench completed the door frames were then fitted and the doors covered.
 We connected the door frames to the tunnels' framework using p-clips and we covered the doors using mesh at the top, to aid ventilation and polythene at the bottom.
 DAY 9
DAY 9The main event. Finishing off the polytunnel. Covering is said to be the most important part of polytunnel construction, get it right and a polytunnel could last you 7 years without needing to replace the covering. So it is no surprise that we took our time to get the covering right. We first lined the framework with anti hotspot tape (this protects the covering which comes into direct contact with the steel frame from getting damaged as a result of the framework heating up).
 We then cleared the area of stones and any other sharp objects that might tear the polythene, unwrapped the sheet and placed it over the framework, making sure it was the right way up.
 Getting the cover tight was the next step and this was done by back filling the trench while stretching the cover. Tightening the sides was not a problem.
 The front and the rear were more challenging as we had to pleat the polythene while tightening by pulling and nailing the sheet to the door posts. My wrists still ache. We had a few finger marks on the covering but nothing to worrying.
 DAY 10
The most rewarding day of them all. Working inside the tunnel is the most amazing thing in the world. We made beds along both sides of the tunnel, leaving space at the back for staging, where plants would start their lives in pot and trays before being planted out. We are also considering making another bed right down the center, but we might leave that for next season.
Well there you have it. Ten days of hard labour with the results nothing short of amazing. I was working in the tunnel yesterday while it was pouring down raining outside. I was so happy i started dancing, in the tunnel, under the rain, dry as a bone.....Brilliant.

Looks brilliant! So proud of it. You could at least be honest about the fox.. you wanted to kill it... even with its big eyes !!
ReplyDeletexxx
PS
Are you suggesting the easiest part was the only bit I helped with?
Good job wish I was there to help but keep on being strong
ReplyDeleteOh boy!this is so cool but lots of work I couldn't do it lol!am proud ah yah big brother!!!!!!!!!!!!
ReplyDeleteHi Randy this is GREAT never knew you were an earth man....GREAT JOB man
ReplyDeleteGood job Randy....this is your cousin from the US this is awesome... runs in the family yea!!!!!!!!
ReplyDeleteIs this Claire's son?if so u look so much different so grown up now!!!!!!!! good work with the lands more lads should do this will keep in touch
ReplyDelete